Kaltura: Recording your screen using Kaltura Personal Capture

Kaltura Capture, also referred to as Personal Capture, is a program that allows you to record your screen and webcam simultaneously, making it a great program to use for recorded presentations or lectures. Recordings made in Kaltura Capture are uploaded directly to your Kaltura account once you're done recording. In this video, learn more about how to use Kaltura Capture to create screen/webcam recordings.

This guide won Best of Category: How-To Guides in the 2022 ACM SIGUCCS Communication Awards.

Kaltura: Recording your screen and webcam using Kaltura Capture

Updated 10-25-2022

Description of the video:

[music] Kaltura Capture, also sometimes referred to as Personal Capture, is a program that allows you to record screencasts that are then directly uploaded to Kaltura. You can also record your webcam as you share your screen, which makes Kaltura Capture ideal for recording presentations. Videos made with Kaltura Capture allow for switching between the recorded sources as well, allowing the viewer to switch between viewing a presenter's webcam and their screen at any time. I'll be demonstrating how to use Kaltura Capture to record a presentation. To get started, in a web browser, go to kaltura.iu.edu. Then, click on the Log In button, then log in with your IU username and passphrase, and authenticate with Duo if necessary. Once the Kaltura site loads, in the upper right corner of the Kaltura page, click Add New, then in the menu that appears, click on Personal Capture. The Kaltura Capture page will load. If this is the first time you've used Kaltura Capture, you'll need to download the program and install it before using it. You’ll only need to do this if you’ve never used Kaltura Capture on your computer before. Underneath the text that says "Using Kaltura Capture for the First Time?", there are links for downloading the software for Windows and MacOS. Click the appropriate link for your operating system to start the download process. I'll be downloading the Windows version of Kaltura Capture for this demonstration, but the program looks and works exactly the same in both Windows and MacOS. After the installer is finished downloading, click on it to start the installation process. Once Kaltura Capture is finished installing, go back to your web browser and refresh the page to load Kaltura Capture. Now that Kaltura Capture is installed, whenever you click on Personal Capture in the Add New menu, the browser will load the Kaltura Capture page and then display a pop-up at the top of the browser window asking if you want to open Kaltura Capture. Click the Open Kaltura Capture button to continue. Kaltura Capture will load, and the interface is relatively straightforward. You can choose to record up to two visual sources, as well as record audio using your microphone. For today's demonstration, I'll be setting the first visual source to my webcam, and my second source to my primary monitor. I'll also check to see that my microphone is recognized by Kaltura Capture. If you have multiple microphones available, you can choose which one you want to use from here. Additionally, I’ll make sure I have my presentation open in PowerPoint. I don’t need to start it yet, though – I can start recording, then start my presentation and edit the video later to delete everything that was recorded before I started presenting. To start recording, click the red Record button. A countdown will appear on screen, as well as the Recording menu. When the countdown is finished, Kaltura Capture will start recording. The Recording menu shows the duration of your recording, and also gives you controls for pausing and ending the recording. To view and use the annotation tools, click on the pencil icon on the right side of the Recording menu. The Annotation menu will appear – click on a tool in the left side of the menu to activate it, then click on a color in the right side of the menu to change the color of your annotations. To hide the menu, click the pencil icon again and the menu will disappear. When you're finished recording, click the Stop Recording button. A message will appear, asking if you're sure you want to stop the recording. Click the "Yes, Stop it" button to finish recording. Kaltura Capture will then open a window displaying thumbnails of the sources you recorded. For me, that's my screen and my webcam. Here, you can also give your video a title, a description, and add tags. When you're ready, click on the Save and Upload button to start the upload process. An important thing to note about videos uploaded from Kaltura Capture is that the video's publishing status is set to Private by default, to give you the opportunity to make edits if needed before publishing the completed video. After clicking Save and Upload, Kaltura will display a list of the videos you’ve recorded on your computer, as well as the upload progress of the video you just created. When the video is finished uploading, you can click on the link at the bottom of the video's listing to open the video's page in your web browser. Depending on how long your video is, Kaltura may still be processing your video when you load your video's page. While it's processing, you can still publish the video. To publish the video, on the video's page, click on Actions, then in the drop-down menu that appears, click on Publish. Kaltura gives you three options for publishing your video: private, unlisted, or published. For today, I’ll click the radio button for Unlisted. To save my changes and publish the video, I’ll click the Save button. Now my video will be accessible to anyone who has the link to it. To learn more about editing videos using Kaltura's built-in video editor, watch the video "Editing Videos using the Kaltura Video Editor". If you're viewing this video in Kaltura, it's linked in this video's description. Now you know how to use Kaltura Capture to record your screen and webcam, and upload it to Kaltura. [music]

Kaltura Capture, also sometimes referred to as Personal Capture, is a program that allows you to record screencasts that are then directly uploaded to Kaltura.  You can also record your webcam as you share your screen, which makes Kaltura Capture ideal for recording presentations. Videos made with Kaltura Capture allow for switching between the recorded sources as well, allowing you to switch between viewing a presenter's webcam and their screen at any time.

Downloading and installing Kaltura Personal Capture

To get started with Kaltura Capture, you'll first need to download and install the software. The following steps will walk you through the process.

  1. Log in to https://kaltura.iu.edu with your username and passphrase.
  2. In the upper right side of the Kaltura site, click on + Add New, and in the menu that appears, click Personal Capture.
  3. In the page that loads, underneath the text “Using Kaltura Capture for the first time?”, click the appropriate download link for your operating system to download the Kaltura Capture installer.
  4. Once the download is complete, run the Kaltura Capture installer.

Once the program is installed, you’ll be able to use Kaltura Capture.

Recording video with Kaltura Personal Capture

Using Kaltura Personal Capture is easy – you can start a recording right from the Kaltura site. During a recording, you can use annotation tools to mark up your screen and call attention to parts of your screen. Once you’re finished recording, it will automatically upload to Kaltura.

Starting a recording

The following steps will walk you through starting a recording in Personal Capture.

  1. To start Personal Capture, if you’ve just installed Kaltura Personal Capture, refresh the Kaltura Personal Capture browser window. Otherwise, in the upper right corner of the Kaltura site, click + Add New, then click Personal Capture.
  2. A message will appear, asking if you want to open Kaltura Capture. Click the Open Kaltura Capture button to continue. 

Kaltura Capture will load, and the interface is relatively straightforward, as shown in the following screenshot:

Screenshot of the Kaltura Capture interface, displaying options for recording your screen, camera, and audio. A preview of the user's screen is displayed underneath the Screen option.

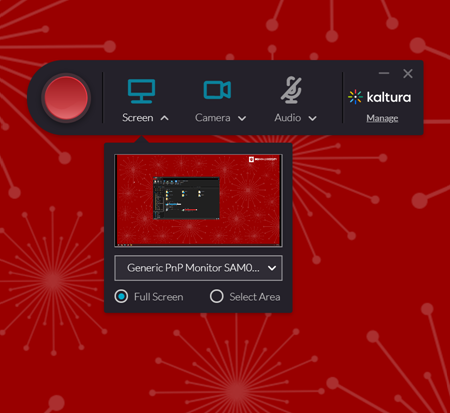
In Kaltura Personal Capture, you have the option to record your screen, camera, and microphone.

  1. To choose the screen you want to record, if necessary, in the Kaltura Capture app, click Screen, then use the dropdown menu underneath the video preview to choose the screen you want to record.
  2. To choose a specific webcam to record from, if necessary, click Camera, then use the dropdown menu underneath the video preview to choose the desired webcam.
  3. To choose a specific microphone for recording audio, if necessary, click Audio, then use the dropdown menu that appears to choose the appropriate microphone.
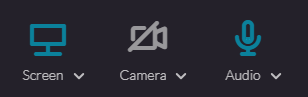
  4. To disable screen, camera, or microphone recording, click on the icon for the source you want to disable. The icon will change, indicating the source is disabled, as seen in the following image where the camera has been disabled:
    Screenshot of a section of the Kaltura Capture interface. The camera option is grayed out, demonstrating how the interface will look if a recording source is disabled.
  5. To start recording, in the left side of the Kaltura Capture interface, click Start Recording

Recording tools

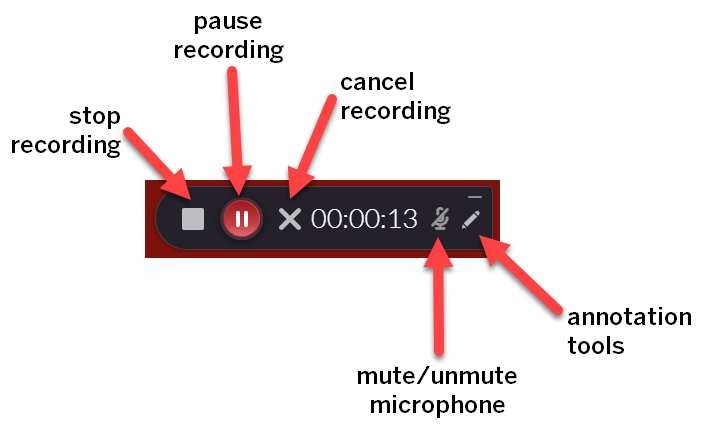
When recording, Kaltura Capture will show a set of controls for stopping, pausing, or canceling your recording, as well as for opening the annotation tools:

Diagram of the Kaltura Capture tools shown while recording. Stop Recording is on the far left of the toolbar, with Pause Recording and Cancel Recording to the right. On the far right of the toolbar is the mute/unmute option and the annotation tools.

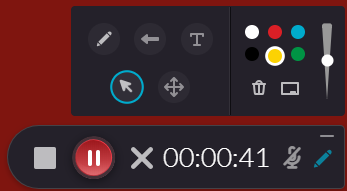
The annotation tools allow you to mark up your video as you’re recording. You have the option to draw on the screen, add text and shapes, as well as clear all annotations. The following screenshot shows the annotation tools:

Screenshot of the annotation tools available in Kaltura Capture.

Stopping a recording

  1. To stop recording, in the Kaltura Capture toolbar, click Stop Recording
  2. In the pop-up that appears, click Yes, Stop it to finish recording.

Kaltura Capture will then open a window displaying a thumbnail of your video, as shown in the following screenshot:

The Kaltura Capture window shown after completing a recording. The window contains a preview of the recorded video, and has fields where the user can enter the video's title, description, and tags.

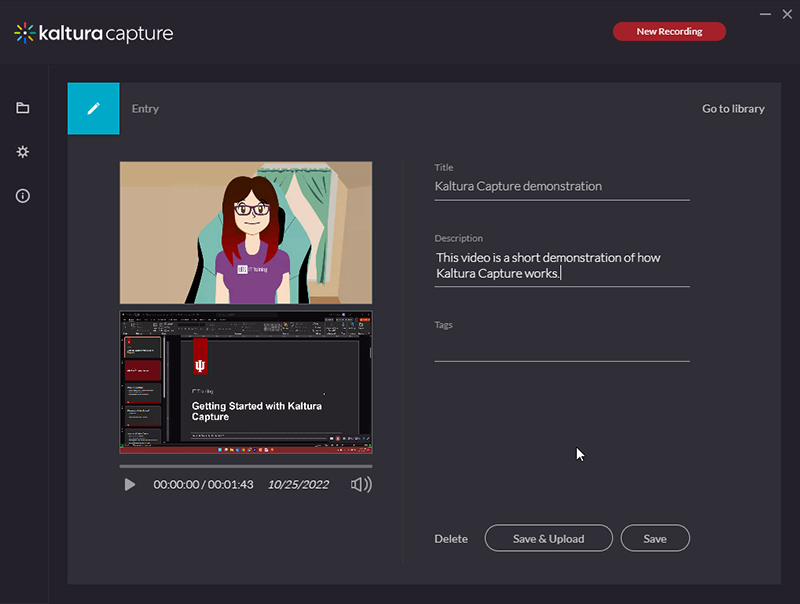
From here, you can give the recording a title and description, and assign tags.  You can also preview the completed recording. When you’re ready to upload your video, at the bottom of the Kaltura Capture window, click Save & Upload. Kaltura Capture will upload the video to your Kaltura account.

Publishing a video recorded in Kaltura Capture

An important thing to note about Kaltura Capture is that when a video is uploaded, the video's visibility level is set to Private by default, to give you the opportunity to make edits if need be before publishing the completed video. The following steps will walk you through publishing a video.

  1. Log in to Kaltura, if necessary.
  2. To view your recording, in the upper right corner of the Kaltura window, click your name, then click My Media.
  3. To open the recording, in the list of media that appears, click on the name of the video you just uploaded.
  4. To publish the video, on the video's page, scroll down until you see the Actions menu. Click on Actions, then in the drop-down menu that appears, click Publish.
  5. To choose the access level for your video, click the radio button for the level of access you want.
    1. Private means the video is only accessible to you.
    2. Unlisted means that only people with the link to the video can access it.
    3. Published means that the video is publicly available in Kaltura and will show up in search results.
  6. To save the changes you made, click Save.