

Recording classes held in Zoom can be helpful for students who may have to miss a lecture due to illness, and can also be useful for students who want to review a lecture's content later. This resource will walk you through the process of recording a lecture in Zoom.
About this session
- Instructor: Beth Lynn Nolen
- Duration: 6 minutes 39 seconds
- Audience: IU instructors, staff, and students
Zoom: Recording meetings
Description of the video:
Recording classes held in Zoom can be helpful for students who may have to miss a lecture due to illness, and can also be useful for students who want to review a lecture’s content later. Recorded meetings can be saved to your computer, or they can be automatically uploaded to Kaltura using Zoom's cloud recording feature. In this video, I'll be covering how to record class sessions to your computer, as well as how to upload them to Kaltura after recording is done. First, there are some important things to keep in mind when recording meetings in Zoom: The meeting will be recorded using the layout that the host is using. For example, if the host is using Gallery View to view everyone’s webcams at once, the recording will be in Gallery View. The recording does not include the chat. Because of this, you may want to repeat any questions asked in the chat out loud before answering them. When recording a Zoom session to your computer, the file takes a little while to process once the meeting has ended. If you have two back-to-back sessions you’re recording, you’ll need to leave some time between sessions to allow Zoom to process the recording, or pause the processing and restart it later. Additionally, you can also have your recording automatically uploaded to Kaltura using the Record to the cloud option, which will eliminate that processing time. Before you start recording, you may want to check your recording settings to make sure everything is set up the way you want it. To check and adjust the recording settings for your Zoom account, you’ll first want to log in to Zoom at https://zoom.iu.edu. From here, in the left-hand navigation, click on Settings. When the Settings view loads, in the navigation at the top of the screen, click Recording. The settings for recording meetings will display. The first setting you’ll want to check is the Local recording setting – this controls the ability to record to your computer. To enable local recording, make sure the toggle switch for the setting is toggled on. Additionally, you can give participants the ability to record the meetings to their own computers – to turn this setting on or off, check (or uncheck) the checkbox next to Hosts can give participants the permission to record locally. If you want all meetings to automatically record as soon as they’re started, you’ll want to ensure the switch for Automatic recording is toggled on, and that the option for Record on the local computer is selected. If you only want specific meetings recorded automatically, you can change that in a specific meeting’s settings. The option to record meetings automatically is in the Meeting Options section of the meeting settings view. To set the meeting to record automatically, check the Record the meeting automatically checkbox. If you’ve already created a meeting and decide later to have the meeting record automatically, you can turn this setting on at any time by editing the meeting you want to record and checking the appropriate checkbox. When this setting is active, as soon as you enter the meeting room Zoom will start recording the session. However, what if you want to manually record a meeting? This can be done once the meeting is started, right in the meeting room. There are two places you can find the option for recording a Zoom meeting: in the menu at the bottom of the Zoom window, and in the menu that appears at the top of the screen when the screen is shared. To start a recording when you’re not sharing your screen, simply hover over the bottom of the Zoom window to bring up the menu, then click Record. If the options for both cloud and local recording appear, click Record on this Computer. Once the recording starts, the Record button will turn into controls for pausing or stopping the recording. To start recording while your screen is being shared, the process is similar – however, the options for recording are in the More menu, in the menu bar at the top of the screen. Click Record on This Computer, and Zoom will start recording the session. To access the controls for pausing or stopping the recording, you’ll need to go back to the More menu, and then click the appropriate menu option for what you want to do. Let’s explore what happens when you stop recording. When ending a local recording, once you click Stop recording, a small dialog box will appear in the upper right corner of your screen, notifying you that the recording will be converted when the meeting ends. You can continue your meeting if you want, or end it here. Once the meeting is ended, another dialog box will appear, indicating the recording is being converted. This process may take some time, depending on how long the recording is. If for some reason you can’t complete the conversion process at this time, you can click the Stop Converting button to stop Zoom from converting the recording. You can restart the conversion process later by going to the Zoom desktop app, navigating to Meetings, then in the left navigation, clicking on Recorded to view a list of your recorded meetings. Select the meeting you want to start converting, then click Convert. After the recording is done processing, the folder containing the files will open and you can then upload the finished recording to a video hosting service. There’s one last thing to go over – uploading a local recording to Kaltura. If you’ve recorded your meeting to your computer, you’ll need to upload it to a video hosting service so your students can view it. The following instructions walk you through uploading a video to Kaltura at IU. First, you'll want to make sure you're logged in to Kaltura at https://kaltura.iu.edu. To start the process of uploading a recording, in the upper right corner of the Kaltura interface, click Add New. To select the type of item you’re adding, in the Add New menu, click Media Upload. To select the file to upload, on the Upload Media page, click the Choose a file to upload button, then navigate to the file you wish to upload and double-click on it to select it. The media file will begin uploading at this point, and you can fill out the information for the video in the screen that appears. When you’re finished adding the information for the video, click Save. To publish the video, once the video’s information has been saved, click the appropriate radio button for the access level you want to assign to the video. Private means the video is only accessible to you. Unlisted means that only people with the link to the video can access it. This might be a good setting to choose if you don’t want your lectures to be public. Public means that the video is publicly available in Kaltura, and will show up in search results. To save any changes you made to the access level, click Save.Description of the video:
Recording classes held in Zoom can be helpful for students who may have to miss a lecture due to illness, and can also be useful for students who want to review a lecture’s content later. Recorded meetings can be saved to your computer, or they can be automatically uploaded to Kaltura using Zoom's cloud recording feature. In this video, I'll be covering how to record class sessions to Kaltura with Cloud Recording. First, there are some important things to keep in mind when recording meetings in Zoom: The meeting will be recorded using the layout that the host is using. For example, if the host is using Gallery View to view everyone’s webcams at once, the recording will be in Gallery View. The recording does not include the chat. Because of this, you may want to repeat any questions asked in the chat out loud before answering them. Before you start recording, you may want to check your recording settings to make sure everything is set up the way you want it. To check and adjust the recording settings for your Zoom account, you’ll first want to log in to Zoom at https://zoom.iu.edu. From here, in the left-hand navigation, click on Settings. When the Settings view loads, in the navigation at the top of the screen, click Recording. The settings for recording meetings will display. If you want to have your meeting recordings automatically uploaded to Kaltura, you’ll want to ensure the switch for the Cloud recording setting is toggled on. One important thing to note about cloud recording is that in order for it to work properly, you’ll need to make sure you have a Kaltura account before recording to the cloud. To create a Kaltura account, simply log in with your IU username and password at kaltura.iu.edu – if you don’t already have an account one will be created for you when you log in. If you want all meetings to automatically record as soon as they’re started, you’ll want to ensure the switch for Automatic recording is toggled on, and the option for Record to the cloud is selected. If you only want specific meetings recorded automatically, you can change that in a specific meeting’s settings. The option to record meetings automatically is in the Meeting Options section of the meeting settings view. To set the meeting to record automatically, check the Record the meeting automatically checkbox. If you’ve already created a meeting and decide later to have the meeting record automatically, you can turn this setting on at any time by editing the meeting you want to record and checking the appropriate checkbox. When this setting is active, as soon as someone enters the meeting room Zoom will start recording the session. However, what if you want to manually record a meeting? This can be done once the meeting is started, right in the meeting room. There are two places you can find the option for recording a Zoom meeting: in the menu at the bottom of the Zoom window, and in the menu that appears at the top of the screen when the screen is shared. To start a recording when you’re not sharing your screen, simply hover over the bottom of the Zoom window to bring up the menu, then click Record. If the options for both cloud and local recording appear, click Record to the Cloud. Once the recording starts, the Record button will turn into controls for pausing or stopping the recording. To start recording while your screen is being shared, the process is similar – however, the options for recording are in the More menu, in the menu bar at the top of the screen. Click Record to the Cloud, and Zoom will start recording the session. To access the controls for pausing or stopping the recording, you’ll need to go back to the More menu, and then click the appropriate menu option for what you want to do. Let’s explore what happens when you stop recording. When ending a cloud recording, once you click Stop Recording, you’ll be shown a dialog box, confirming you want to stop recording and indicating you’ll be emailed when your recording has finished processing. To stop recording, click Yes – at this point, Zoom will upload the recording to Kaltura and begin processing the recording. A small dialog box will appear in the upper right corner of your screen, notifying you that you’ll be emailed when the recording is available. Once you've received the email indicating the recording is available, you'll want to go to Kaltura and publish the recording - by default, meetings recorded using Zoom's cloud recording option are set to Private. To publish a meeting, first, log in to Kaltura at kaltura.iu.edu. To access your recordings, in the upper right corner of the Kaltura interface, click your name, and then click My Media. A list of your recordings will load. Cloud recordings are saved with the name you gave the meeting in Zoom - look for the specific recording you want to publish, and click on its name to load it. Before publishing a recorded class session, you may want to edit the title of the recording or add a description. To do that, underneath the video, click Actions, then click Edit. The Edit screen will display - from here, you can make changes to the meeting's details and click Save when you're done. You may also want to edit the video to remove sections of the recording you don't want- this can be done from right inside Kaltura. To do this, while in Edit mode, click the Launch Editor button next to the video and the Kaltura video editor will load. For a detailed walkthrough of how to use the Kaltura editor, on the Kaltura at IU site, search for the video Editing Videos using the Kaltura Video Editor. To publish a video, you'll want to go to the video's page again, and underneath the video, click Actions. Then, in the menu that appears, click Publish. From here, you can choose whether to make your video unlisted, so only people with the link can access it, or public, which means it'll show up in the search listings for Kaltura. If you don't want your lectures to be publicly available, choose unlisted, and make sure to share the link with your students. Once you've chosen the desired access level, click Save to publish your video.Recording meetings in Zoom
Recording classes held in Zoom can be helpful for students who may have to miss a lecture due to illness, and can also be useful for students who want to review a lecture's content later. Recorded meetings can be saved to your computer, or they can be automatically uploaded to Kaltura once the recording is finished.
Important notes to keep in mind when recording meetings in Zoom:
- The meeting will be recorded using the layout that the host is using. For example, if the host is using Gallery View to view everyone's webcams at once, the recording will be in Gallery View.
- The recording does not include the chat. Because of this, you may want to repeat any questions asked in the chat out loud before answering them.
- When recording a Zoom session to your computer, the file takes a little while to process once the meeting has ended. If you have two back-to-back sessions you're recording, you'll need to leave some time between sessions to allow Zoom to process the recording, or you can have your recording automatically uploaded to Kaltura using the Record to the cloud option.
There are two methods you can use to record class sessions held in Zoom:
- You can set the meeting to record automatically.
- You can manually start the recording.
Before you start recording, you may want to check your recording settings to make sure everything is set up the way you want it.
Checking and adjusting recording settings
- Log in to Zoom at https://zoom.iu.edu.
- In the left-hand navigation, click on Settings.
- When the Settings view loads, in the navigation at the top of the screen, click Recording. The settings for recording meetings will display.
The first setting you'll want to check is the Local recording setting. This controls the ability to record to your computer. To enable local recording, make sure the toggle switch for the setting is toggled on, as seen in the following screenshot:

Additionally, you can give participants the ability to record the meetings to their own computers. To turn this setting on or off, check (or uncheck) the checkbox next to Hosts can give participants the permission to record locally.
If you want to have your meeting recordings automatically uploaded to Kaltura, you'll want to ensure the switch for the Cloud recording setting is toggled on, as shown in the following screenshot:
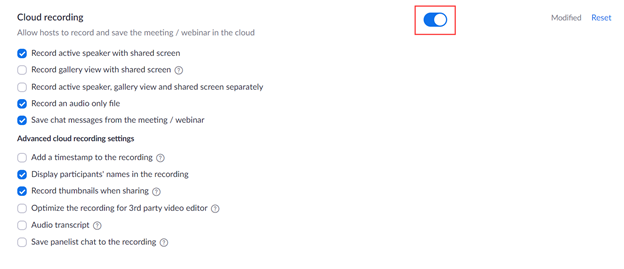
You also have the ability to change a number of settings related to recording to the cloud. For more information on the various cloud recording settings, view the cloud recording settings section of the Zoom Cloud Recording help documentation.
IMPORTANT: In order for cloud recording to work properly, you'll need to make sure you have a Kaltura account before recording to the cloud. To create a Kaltura account, simply log in to Kaltura at https://kaltura.iu.edu. If you don't already have an account, one will be created for you when you log in.
If you want all meetings to automatically record as soon as they're started, you'll want to ensure the switch for Automatic recording is toggled on, as seen in the following screenshot:

Additionally, you can have automatic recordings saved to your computer or uploaded to Kaltura, as seen in the previous screenshot.
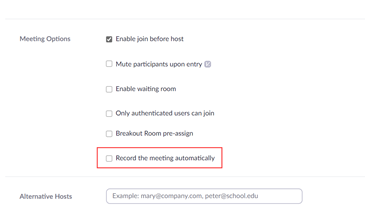
Automatically recording a Zoom meeting
As seen in the previous section, you can set all meetings to record automatically. However, if you only want specific meetings recorded automatically, you can change this in a specific meeting session's settings. The option to record meetings automatically is located in the Meeting Options section of the meeting settings view, as shown in the following screenshot:
To set the meeting to record automatically, check the Record the meeting automatically checkbox. If you've already created a meeting and decide later to have the meeting record automatically, you can turn this setting on at any time by editing the meeting you want to record and checking the appropriate checkbox.
When this setting is active, as soon as someone enters the meeting room, Zoom will start recording the session. For more information on automatically recording meetings, view the Zoom help documentation on automatic recording.
NOTE: For more information on creating meetings, see the document Scheduling and Starting a Meeting in Zoom.
Manually recording a zoom meeting
There are two places you can find the option for recording a Zoom meeting: in the bottom menu when you're not sharing your screen, and in the menu that appears at the top of the screen when the screen is shared.
Recording when not sharing your screen
The following screenshot shows where the record option is located when you're not sharing your screen:

Clicking Record will pop up a menu where you can choose to record to your computer or record to the cloud, which will result in your recording being automatically uploaded to Kaltura.
When the meeting is recording, the Record button will turn into controls for pausing or stopping the recording:

Recording when sharing your screen
When you're sharing your screen, the options for recording the meeting are located in the More menu in the menu bar at the top of the screen, as seen in the following screenshot:
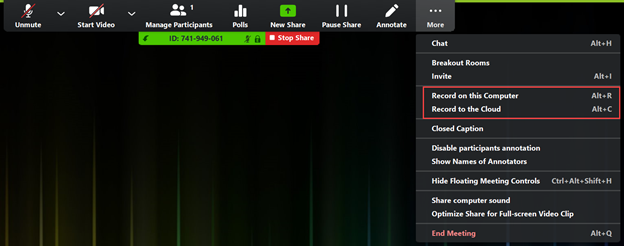
From this menu, you can choose to record to your computer or record to the cloud.
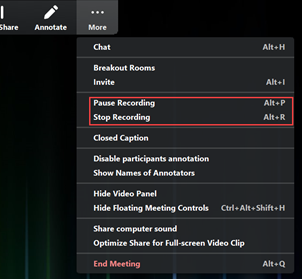
To access the controls for pausing or stopping the recording, you'll need to go back to the More menu in the Menu bar, as shown in the following screenshot:
Ending a recording
When finished recording, click Stop Recording and the meeting will stop recording. At this point, Zoom will behave differently depending on whether you're recording to your computer (a local recording) or to the cloud.
Ending a local recording
When ending a local recording, once you click Stop Recording, a small dialog box will appear in the upper right corner of your screen, notifying you that the recording will be converted when the meeting ends:

Once the meeting is ended, another dialog box will appear, indicating the recording is being converted:
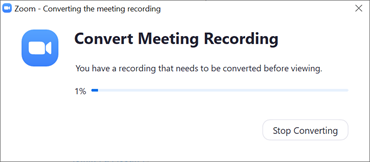
This process may take some time, depending on how long the recording is.
Ending a cloud recording
When ending a cloud recording, once you click Stop Recording, you'll be shown a dialog box, confirming you want to stop recording and indicating you'll be emailed when your recording has finished processing:
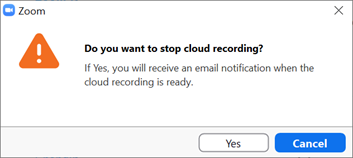
To stop recording, click Yes. At this point, Zoom will upload the recording to Kaltura and begin processing the recording. A small dialog box will appear in the upper right corner of your screen, notifying you that you'll be emailed when the recording is available:

When the meeting is available, you can log into Kaltura and make any edits to the video, then publish it.
For information about working with Zoom meetings uploaded to Kaltura, view the IU Knowledge Base article Access and publish Zoom recordings in Kaltura.
For more information on editing Zoom recordings in Kaltura, watch the video Editing Videos Using the Kaltura Video Editor.
Uploading a local recording to Kaltura
If you've recorded your meeting to your computer, you'll need to upload it to a video hosting service so your students can view it. The following instructions walk you through uploading a video to Kaltura at IU.
- Log in to Kaltura at https://kaltura.iu.edu.
- To start the process of uploading a recording, in the upper right corner of the Kaltura interface, click + Add New.
- To select the type of item you're adding, in the Add New menu, click Media Upload.
- To select the file to upload, on the Upload Media page, click the + Choose a file to upload button, then navigate to the file you wish to upload and double-click on it to select it.
- The media file will begin uploading at this point, and you can fill out the information for the video in the screen that appears. When you're finished adding the information for the video, click Save.
- To publish the video, once the video's information has been saved, click the appropriate radio button for the access level you want to assign to the video.
- Private means the video is only accessible to you.
- Unlisted means that only people with the link to the video can access it (this might be a good setting to choose if you don't want your lectures to be public).
- Public means that the video is publicly available in Kaltura, and will show up in search results.
- To save any changes you made to the access level, click Save.