

Breakout rooms can be useful for facilitating group work or group discussion in a class. While using breakout rooms requires some setup beforehand, they are easy to use during a class session. This resource will walk you through enabling breakout rooms in your Zoom meetings, as well as how to start breakout rooms while teaching in Zoom.
About this session
- Instructor: Beth Lynn Nolen
- Duration: 4 minutes 36 seconds
- Audience: IU instructors, staff, and students
Zoom: Using breakout rooms
Description of the video:
In this video, I’ll be discussing how to set up and use breakout rooms in Zoom. Breakout rooms can be useful for facilitating group work or group discussion in an online class session. Following are some important things to note about breakout rooms in Zoom: First, up to 50 breakout rooms can be created for a single Zoom meeting. The meeting host can move between breakout rooms, to monitor activity and answer questions as needed. If a class session is being recorded, depending on how the session is recorded, Zoom will behave differently: For a local recording, the recording will follow the host to whatever breakout room(s) they visit. If you plan to record class sessions and use breakout rooms, a local recording may be the best option for you. If you’re recording a meeting to the cloud, the meeting recording is initiated only in the main room – if the host moves to a breakout room, the recording will pause. When the host returns to the main room, recording will resume. Breakout rooms can’t currently be recorded to the cloud. To get started, let’s go over how to enable breakout rooms in your meetings. First, you’ll want to log in to Zoom at https://zoom.iu.edu. Once logged in, in the navigation menu on the left, click Settings – you’ll be shown meeting settings by default. From here, in the meeting settings navigation, click In Meeting (Advanced). The page will scroll down to the In Meeting (Advanced) settings – the breakout room option is the first one listed. To enable breakout rooms in your meetings, make sure the Breakout room toggle is set to on. Now, when you start a meeting, the breakout room option will be available in the Zoom menu at the bottom of the screen. Now, let’s see how to start breakout sessions when you’re in a meeting. To start breakout sessions, in in the menu at the bottom of the Zoom window, click Breakout Rooms. The Create Breakout Rooms window will appear. First, you’ll want to determine how many rooms you need – once you’ve decided, the next step is determining how to assign participants to a room: automatically or manually. Automatic assignment works well for group discussions or group work that doesn’t involve pre-arranged groupings, while manual assignment is best for assigning pre-constructed groups to breakout rooms and ensuring all members of a group end up in the same room. To automatically assign participants to breakout rooms, select the Automatically radio button. When you’re ready, click Create Rooms – the Breakout Rooms dialog box will appear, and will show the rooms populated with participants. To manually assign participants to breakout rooms, select the Manually radio button and click Create Rooms. The Breakout Rooms dialog box will appear, and we can assign students to a breakout room by clicking Assign to the right of the breakout room’s name. A pop-up will appear with a list of participants – to add a student to a breakout room, just click the checkbox next to their name and they’ll be added to the selected room. Once students are assigned to rooms, you can click the Open All Rooms button and breakouts will start. Once breakout rooms are open, there are a few things you can do during the breakouts. You can move between breakout rooms as you need to in order to check in with the different groups. Just open the Breakout Room window by clicking Breakout Rooms in the Zoom menu, then click Join to move to a specific breakout room. If you want to broadcast a message to everyone, this can also be done in the Breakout Rooms window. At the bottom of the window, click Broadcast a message to all, then type your message in the pop-up window and click Broadcast. The message will be sent to all your participants. When you want to end a breakout session, the process is simple. To end breakouts and close the breakout rooms, in the Zoom menu at the bottom of the screen, click Breakout Rooms to bring up the Breakout Rooms dialog box. From here, in the bottom right corner of the dialog box, click Close All Rooms. Participants will then see a dialog box indicating that breakout rooms will close in 60 seconds. After the 60 seconds are up, all participants will be returned to the main room. Now you know how to work with breakout rooms in Zoom!Using breakout rooms in Zoom
Breakout rooms can be useful for facilitating group work or group discussion in a class. While using breakout rooms requires some setup beforehand, they are easy to use during a class session.
Important things to note about breakout rooms in Zoom:
- Up to 50 breakout rooms can be created for a single Zoom meeting.
- The meeting host can move between breakout rooms, to monitor activity and answer questions as needed.
- If a class session is being recorded, depending on how the session is recorded, Zoom will behave differently:
- Local recording: If you’re recording to your computer, the recording will follow the host to whatever breakout room(s) they visit. If you plan to record class sessions and use breakout rooms, a local recording may be the best option for you.
- Cloud recording: If you’re recording a meeting to the cloud (uploaded to Kaltura), the meeting recording is initiated only in the main room. If the host moves to a breakout room, the recording will pause. When the host returns to the main room, recording will resume. Breakout rooms can’t currently be recorded to the cloud.
- For more information on recording breakout rooms, view the IU Knowledge Base article Record a Zoom breakout room.
Enabling breakout rooms in your meetings
- Log in to Zoom at https://zoom.iu.edu.
- In the navigation menu on the left, click You’ll be shown meeting settings by default.
- Click In Meeting (Advanced), as shown in the following screenshot:
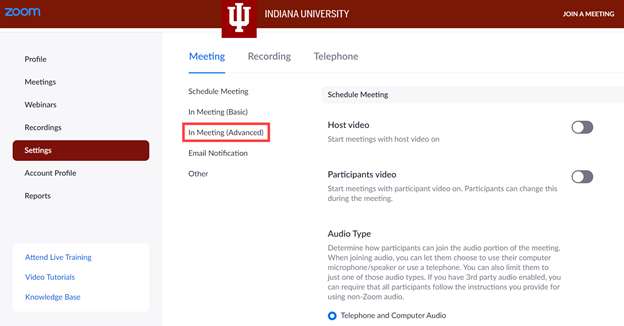
The page will scroll down to the In Meeting (Advanced) settings. The Breakout Room option is the first one listed:
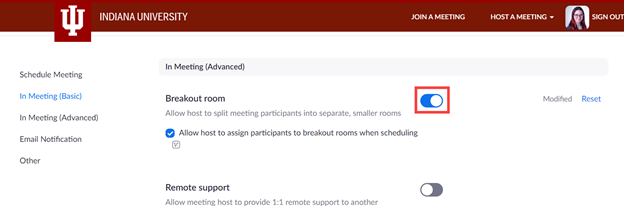
To enable breakout rooms in your meetings, make sure the Breakout room toggle is set to on, as shown in the previous screenshot.
Now, when you start a meeting, the breakout room option will be available in the Zoom menu at the bottom of the screen:
NOTE: The menu options available may be slightly different, depending on what options you have enabled in your personal Zoom account.
Starting breakout sessions
To start breakout sessions, in in the menu at the bottom of the Zoom window, click Breakout Rooms. The Create Breakout Rooms dialog box will appear:
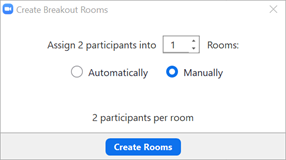
First, you’ll want to determine how many breakout rooms you’ll need. Once you’ve decided how many rooms you’ll need, the next step is deciding how to assign participants to a room: automatically or manually. Automatic assignment works well for group discussions or group work that doesn’t involve pre-arranged groupings, while manual assignment is best for assigning pre-constructed groups to breakout rooms and ensuring all members of a group end up in the same room.
Assigning participants to breakout rooms automatically
To automatically assign participants to breakout rooms, select the Automatically radio button. When you’re ready, click Create Rooms. The Breakout Rooms window will appear, and will show the rooms populated with participants.
Assigning participants to breakout rooms manually
To manually assign participants to breakout rooms, select the Manually radio button and click Create Rooms. The Breakout Rooms window will appear:
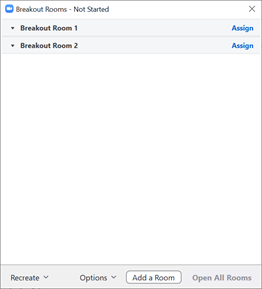
To assign students to a breakout room, click Assign to the right of the breakout room’s name. A menu will appear with a list of participants, as shown in the following screenshot:
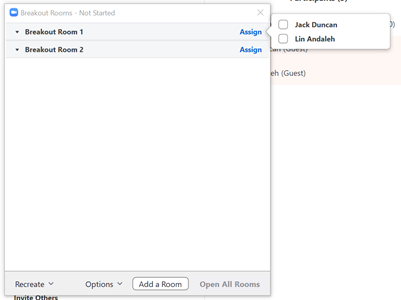
To add a student to a breakout room, click the checkbox next to their name. They will be added to the breakout room.
To start breakout sessions, in the bottom of the Breakout Rooms window, click the Open All Rooms button, as shown in the following screenshot:
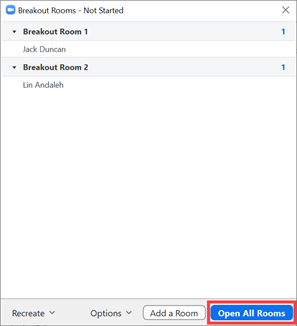
Once the Open All Rooms button is clicked, participants will see a dialog box, asking them to join their breakout room.
During breakout sessions
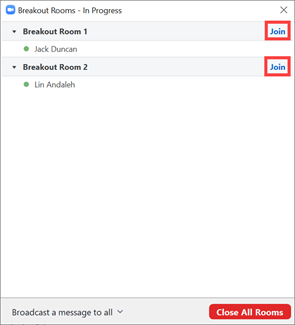
During a breakout session, you can move between rooms as needed. First, in the Zoom menu at the bottom of the screen, click Breakout Rooms. Then in the Breakout Room dialog box, click Join for the room you want to join, as highlighted in the following image:
To broadcast a message to everyone, in the Zoom menu at the bottom of the screen, click Breakout Rooms, then in the bottom left corner of the Breakout Rooms window, click Broadcast a message to all. A text box will pop up, allowing you to type a message:
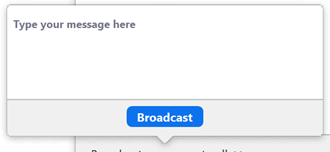
Type in your message, then click Broadcast to send the message to all participants.
Ending breakout sessions
To end breakouts and close the breakout rooms, click Breakout Rooms in the Zoom menu at the bottom of the screen. This will bring up the Breakout Rooms window. From here, in the bottom right corner of the window, click Close All Rooms. Participants will see a dialog box indicating that breakout rooms will close in 60 seconds. After the 60 seconds are up, all participants will be returned to the main room.